|
Getting Started with Dreamweaver
Setting it Up, Creating a Document,
and Uploading It to the Uweb
Server
Step 1: Open Dreamweaver
To open Dreamweaver (default instructions are for computers in the Transcriptions Studio):
1. Click on the Dreamweaver icon on the desktop or select
Start>All Programs>Macromedia> Macromedia Dreamweaver MX 2004 .
Note: If you are using your own computer and want to download a 30-day trial of Dreamweaver 8 for Mac or PC, visit the Adobe link here and select "Download a 30-day Trial," located at the bottom of the page.
Step 2: Define a New Site
Dreamweaver tracks all the documents in your site so that
it can dynamically change embedded HTML references to images,
other pages, and other files in the event you move them from
one directory to another. Consequently, the first thing you
need to do is define your site -- that is, the "local"
directory where your files are/will be stored and the "remote" directory to which
you will be uploading them (in this case, your umail uweb/directory).
To define your site, follow the instructions below:
1. Given you have not taken steps to define your site already, please
begin by opening the "Files" window by selecting Window>Files.
However, if you are looking at an "Untitled Document"
window:
a.) Select Windows>Site Files.
b.) When the Site window appears, select Site>Define
Sites.
The Define Sites dialog box appears:
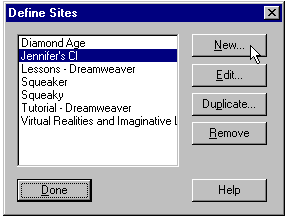
2. Click the New button.
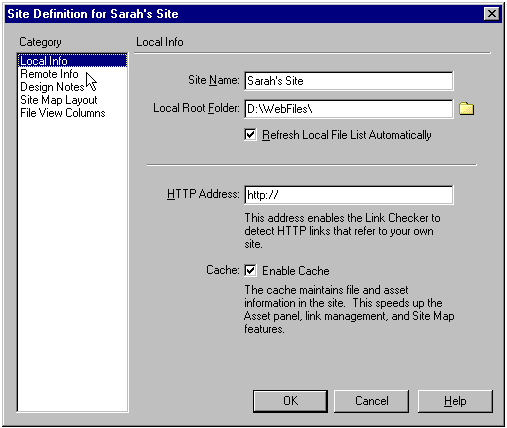
The Site Definition dialog box appears.
3. In the Site Name text box, type a name for your site (for
example "Sarah's Site").
4. In the Local Root Folder text box, type the drive and
path to your work files.
For example, if your work files are/will be on a ZIP disk
in a folder (which you created for your webwork) called
"Web Files," you would type "D:\WebFiles":
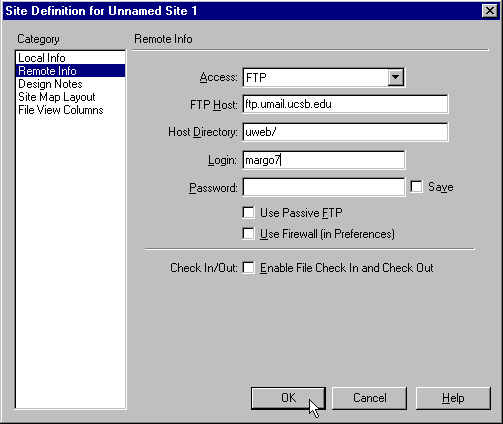
5. From the Category area (on the left), select either
Remote Info or Web Server Info, whichever appears
there.
You will now give Dreamweaver the information it needs
to upload the HTML and image files you will be developing
for your site:
a.) In the Access pull-down list box, select "FTP."
b.) In the FTP Host text box, type "ftp.umail.ucsb.edu".
c.) In the Host Directory text box, type "uweb/".
d.) In the Login text box, type your UCSB email user ID.
For example, if your email address is margo7@umail.ucsb.edu,
you would write "margo7."
e.) In the Password text box, type your UCSB email
password.
Note: If you are working in a public lab or studio, you
may wish to skip saving your password at this point (so
that your password isn't saved onto the hard drive of a
public computer). If this is the case, skip this step and
you will be prompted to enter your password by hand whenever
it is needed.
6. Click [OK]. If prompted to create a cache file,
click [Create].
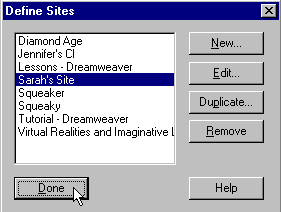
7. Click [Done] in the Define Sites dialog box.
The Site window now displays your local folder (which
exists on the C:\ (hard) drive, on a zip disk in the D:\
drive (your best option here due to both the amount of space
and the privacy/mobility this type of disk offers you) or
on a floppy in the A:\ drive) on the right side of the screen,
as well as the contents of this folder (if there are any
to display).
Note: If the Site window doesn't appear after you
click [Done], access it now by clicking on Window>Site
Files. Click the [Refresh] button on the Site
window toolbar to display your local and remote files. If
you click the [Refresh] button, you can skip step
8.
To display the contents of your remote folder:
8. Click on the [Connect] button at the top of the
window (select Site>Connect in Dreamweaver 4)
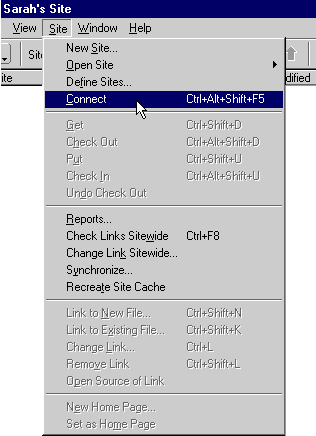
The site window now displays your Uweb folder and its contents
(if there are any to display) on the left side of your screen.
The rest of these instructions provide a brief tutorial
for creating a simple web page in Dreamweaver, uploading
it, and viewing it in a Web browser.
Step 3: Create a Page in Dreamweaver
1. Select File>New from the Site window.
An "Untitled Document" window appears.
2. Design a page that has a heading followed by a block of
text, as you would, for example, in Microsoft Word. Note,
however, that fonts, font styles, and font sizes are controlled
through Dreamweaver's properties dialog. If you don't see
a properties dialog, select Windows>Properties to
display it. Here is an illustration of what the "Properties
Dialog" looks like:

Note: As you are making this page, you can press the <F12>
key to see what it will actually look like in a Browser.
After you have created your page and formatted it as you
want it to appear on the Web, then:
3. Select File>Save.
4. In the Save dialog box, give the document a name
(followed by either ".htm" or ".html").
Check to make sure you are saving your file to the same directory
you defined as your "Local Root Folder" earlier,
then click [Save].
5. Select File>Close to close the document.
Step 4: Upload the Page
Return to the Site window. It should display the html
page you just created in the "Local Folder" area.
To upload the page:
1. Click on the file to highlight it.
2. Click the up arrow on the Site window's toolbar.

Note: An alternative way to uploading your file is to drag-and-drop
it from the right side of the screen to the appropriate
folder on the right side of the screen.
3. The "Dependent Files" dialog box appears. Click
[No]:
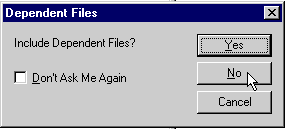
Viola! You can now visit the page through a
Web browser. To do so, open the browser and type the following
as the URL address:
http://www.uweb.ucsb.edu/~[your user id]/[file name]
**For more tutorials, please see the following:
Scanning
Basics
UWeb Publishing
Basics
|