layer hidden off the screen
UCSB English Department Home UCSB English Department Home UCSB English Department Home
Transcriptions
About TranscriptionsCurriculumResearchResourcesEvents
   
   Resources Getting Started with Dreamweaver
Directory


  1. Open Dreamweaver 
  2. Define a New Site
  3. Create a Page in Dreamweaver
  4. Upload the Page

More tech guides Transcriptions technology paradigm

Setting up Dreamweaver, creating a document, andDreamwever Editing Screen uploading it to a server.

This page is a basic tutorial in Dreamweaver for participants in the UCSB Transcriptions Project and students in the project's Literature & Culture of Information (LCI) courses.


Step A. Open Dreamweaver


To open Dreamweaver:

1. Click on the Dreamweaver icon on the desktop or select Start>Programs>Macromedia Dreamweaver.

Note: On some machines you must select Start>Programs>Internet Editors>Macromedia Dreamweaver

Note: There may be more than one version of Dreamweaver (for instance Dreamweaver 4, Dreamweaver UltraDev 4, Dreamweaver MX) running on the computers in the Transcriptions Studio, so navigate to the version that is available to you on the computer you are using. The screenshots and dialogue boxes reproduced below are from Dreamweaver 4, but users of other releases of the program should have no difficult recognizing the closely similar dialogues in their versions.

Note: starting with Dreamweaver MX, Dreamweaver includes the ability to program dynamic database-to-Web behaviors (formerly an exclusive feature of Dreamweaver Ultradev).

If you get a message saying the "local root folder . . . does not exist," stay calm and proceed to Step 2 below.


Step B. Define a New Site

Dreamweaver tracks all the documents in your site so that it can dynamically change embedded HTML references to images, other pages, and other files in the event you move them from one directory to another. Consequently, the first thing you need to do is define your site — that is, the "local" directory where your files are/will be stored (usually on a Zip disk) and the "remote" directory to which you will be uploading them (e.g., a UCSB student's Umail uweb/directory).

To define your site, follow the instructions below:

1. If the "local root folder . . . does not exist" message currently appears, click the Define Sites button.

However, if you are looking at an "Untitled Document" window:

a.) Select Windows>Site Files.
b .) When the Site window appears, select Site>Define Sites.

The Define Sites dialog box appears:
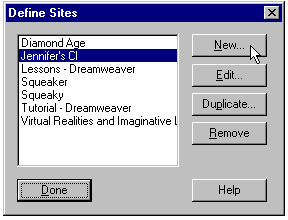
DW "Define Sites" Dialogue

2. Click the New button.

The Site Definition dialog box appears.

3. In the Site Name text box, type a name for your site (for example "Sarah's Site").

4. In the Local Root Folder text box, type the drive and path to your work files.

For example, if your work files are/will be on a ZIP disk in a folder (which you created for your webwork) called "Web Files," you would type "D:\WebFiles":
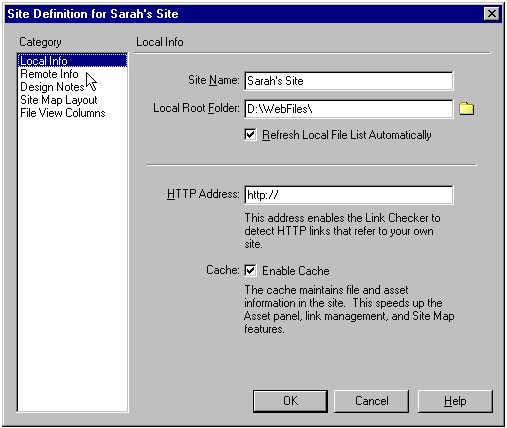
DW "Site Definition" Configuration Dialogue: Local Info

5. From the Category area (on the left), select either Remote Info or Web Server Info, whichever appears there.

You will now give Dreamweaver the information it needs to upload the HTML and image files you will be developing for your site:

a.) In the Access pull-down list box, select "FTP."
b.) In the FTP Host text box, type the name of your server (e.g., "ftp.umail.ucsb.edu").
c.) In the Host Directory text box, type the name of the directory on the server to which you have been given access (e.g., "uweb/").
d.) In the Login text box, type your user ID. (UCSB using Uweb should use their Umail email user ID. For example, if your email address is margo7@umail.ucsb.edu, you would write "margo7.")
e.) In the Password text box, type your password (UCSB students using Uweb should use their Umail password).
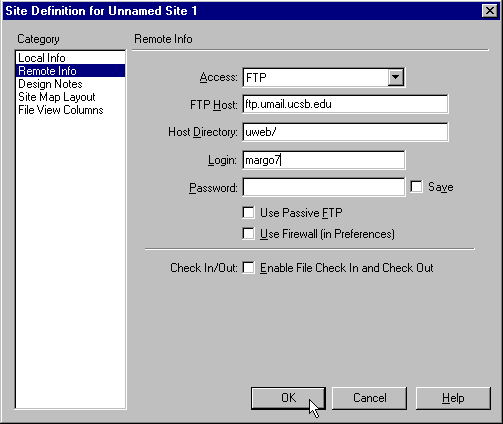
DW "Site Definition" Configuration Dialogue: Remote Info

Note: If you are working in a public lab or studio, do not "save" your password in this dialogue (other users of the public computer would otherwise be able to log in and tamper with your Web files). If you do not save your password in your site definition, you will simply be prompted to enter your password as needed to initiate a session.

6. Click [OK]. If prompted to create a cache file, click [Create].
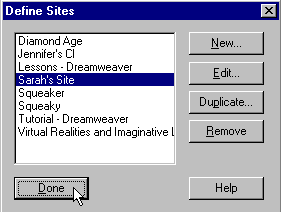
DW "Define Sites" Dialogue: Done

7. Click [Done] in the Define Sites dialog box.

The Site window now displays your local folder (which exists on the C:\ (hard) drive, on a zip disk in the D:\ drive (your best option here due to both the amount of space and the privacy/mobility this type of disk offers you) or on a floppy in the A:\ drive) on the right side of the screen, as well as the contents of this folder (if there are any to display).

Note: If the Site window doesn't appear after you click [Done], access it now by clicking on Window>Site Files. Click the [Refresh] button on the Site window toolbar to display your local and remote files. If you click the [Refresh] button, you can skip step 8.

To display the contents of your remote folder:

8. Click on the [Connect] button at the top of the window (select Site>Connect in Dreamweaver 4)
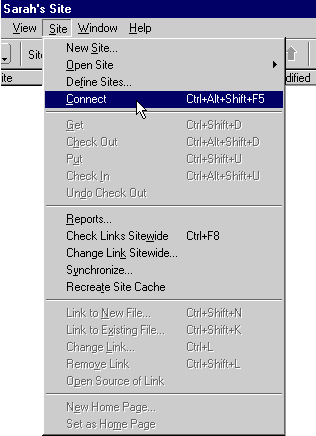
DW: Connecting between local and remote versions of site

The site window now displays your Uweb folder and its contents (if there are any to display) on the left side of your screen.

The rest of these instructions provide a brief tutorial for creating a simple web page in Dreamweaver, uploading it, and viewing it in a Web browser.


Step C. Create a Page in Dreamweaver

1. Select File>New from the Site window.

An "Untitled Document" window appears.

2. Design a page that has a heading followed by a block of text, as you would, for example, in Microsoft Word. Note, however, that fonts, font styles, and font sizes are controlled through Dreamweaver's properties dialog. If you don't see a properties dialog, select Windows>Properties to display it. Here is an illustration of what the "Properties Manager" looks like:

DW "Properties Manager"

Note: As you are making this page, you can press the <F12> key to see what it will actually look like in a Browser.

After you have created your page and formatted it as you want it to appear on the Web, then:

3. Select File>Save.

4. In the Save dialog box, give the document a name (followed by either ".htm" or ".html"). Check to make sure you are saving your file to the same directory you defined as your "Local Root Folder" earlier, then click [Save].

5. Select File>Close to close the document.


Step D. Upload the Page


Return to the Site window. It should display the html page you just created in the "Local Folder" area. To upload the page:

1. Click on the file to highlight it.

2. Click the up arrow on the Site window's toolbar.

DW Site Windown Toolbar

Note: An alternative way to uploading your file is to drag-and-drop it from the right side of the screen to the appropriate folder on the right side of the screen.

3. The "Dependent Files" dialog box appears. Click [No]:

DW "Dependent Files" Dialogue

Note: When Dreamweaver asks if you wish to upload or download "dependent files," it is asking whether you want to transmit not just the page you have currently selected but all other files in your site that this page requires to display properly (e.g., images, scripts, templates, stylesheet files, etc.). Except when you are first setting up a site, it is good policy never to say "yes" to the automatic transmission of dependent files. Download or upload the related files manually as needed. This helps prevent the unintended over-writing of files (e.g., by older or alternative versions). Such prevention is especially crucial when working collaboratively on a site with others.

Viola! You can now visit the page through a Web browser. To do so, open the browser and type the URL address of yor page (e.g., http://www.uweb.ucsb.edu/~[your user id]/[file name])


Click to format the
page for projection.
Click to return to the
default page view.