|
|
|
|
 Scanning
Basics
Scanning
Basics
| |
 utorial
for the scanner in the Transcriptions
studio: this tutorial gives students who are
new to Web authoring a step-by-step introduction.
Though the instructions are customized for a particular
scanner, they should also provide users of other
equipment with a good sense of the overall process.
(Other equipment is also available to Transcriptions
/ LCI students at various
locations in the UCSB English Dept. and elsewhere
on campus.) utorial
for the scanner in the Transcriptions
studio: this tutorial gives students who are
new to Web authoring a step-by-step introduction.
Though the instructions are customized for a particular
scanner, they should also provide users of other
equipment with a good sense of the overall process.
(Other equipment is also available to Transcriptions
/ LCI students at various
locations in the UCSB English Dept. and elsewhere
on campus.)
|
|
Step A. Setting Up |
1.
Look around the Transcriptions Studio and
locate the computer that is attached to the scanner.
(Currently the scanner is a UMAX: Astra 4000U.)
1a. Turn on the scanner (flip the switch located
at the back of the machine from "O"
to "I". After its initial startup,
the scanner light (at the front of the machine)
should be green. If the light is flashing, turn
the scanner off for a moment and then turn it
on again. When the light is solid green, proceed
to step 1b.
1b. If the computer to which the scanner is
attached is already running, you must restart
the computer so that it will recognize its attachment
to the scanner. (To restart, go to the "Start"
menu on the bottom left of the computer, choose
"Shut Down." When the options window
pops up, choose "Restart."
2.
When your computer has finished restarting, open
Photoshop. To do this, double click on
the Photoshop icon on your desktop, or go to the
"Start" menu and select Programs>Adobe>Photoshop
5.5.
3.
To open the Scanner software within Photoshop,
choose File>Import>Twain_32.
The "Vista Scan" software will
pop up on your screen.
|
|
Step B. Scanning
the Object (photo, drawing, etc.) |
1.
At the top of the Vista Scan screen, there are
two options: "Beginner" and "Advanced."
If this is your first time scanning an image,
choose Beginner.
Note: The difference between the "Beginner"
and the "Advanced" options is that
in the former you defer to the default setup
for the various settings needed for scanning,
such as digital colour complexity, resolution
(dpi), filters (blurring and sharpening the
image), and size of the image (percentage of
the image you want to reproduce in relation
to actual size), whereas with the latter you
choose these settings yourself. If you become
interested in manipulating these settings in
order to create specific aesthetic effects later
on, you can choose Advanced and play
around with it.
2.
Next, become familiar with the "Beginner"'s
Vista Scan screen:
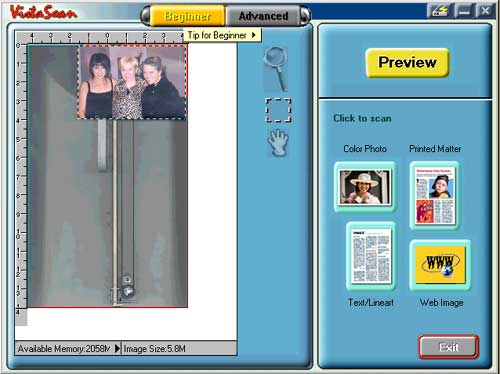
a. On the top right hand side of the screen
is the "Preview" button.
b. Below this button is a series of choices
(Color Photo; Printed Matter; Text/Lineart,
Web Image); the selection of one of these buttons
(whichever best matches the image you wish to
scan) will give the actual Scan command and
manipulate the default settings to accord with
the given description you have chosen.
c. Finally, the left side of the screen is
your workspace; this space will be where you
view your preview scans.
Note: You may see preview scan images
that do not belong to you on the left side
of the screen. Don't worry, this is simply
a result of the fact that this software remembers
the last preview scan the computer/scanner
performed. When you perform your preview scan
in a few moments, this image will be replaced
by your image.
3.
Open the scanner and place the image you wish
to scan facing downward at the top left corner
of the glass frame, flush with the scanner's ruled
edges. This will ensure that you scan your
image in straight (rather than crooked).
Note: You don't need to worry too much
whether your image is spatially oriented in
the way you wish it to be viewed on your web
page (right side up, in other words). You will
be able to manipulate your image to be oriented
correctly in Photoshop after the image has been
scanned in.
4.
Now you are ready to perform a preview scan, which
can be thought of as a dress rehearsal of the
actual scan. Click on Preview. A
small window will pop up showing you the progress
of your preview scan and giving you the option
to "abort," which you do not want to
do. You will hear the scanner whirring as it performs
this preview.
Note: Preview scans are by definition
"low resolution," (meaning not digitally
complex, not requiring a lot of information
memory/storage), so this action should take
less than a minute to perform regardless of
the size of your image.
5.
You will see a small representation of the image
you preview scanned on the left side of your Vista
Scan screen. A long rectangular blinking box will
encompass your image.
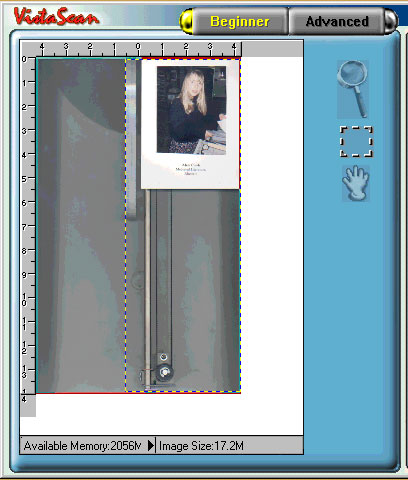
The entirety of the contents of the rectangular
box represents what you will actually scan in
when you perform the actual scan in a few
moments. Your goal is to make this space as small
as you can while still allowing room for your
image to be scanned in its entirety. To do this:
a. Move your cursor to the bottom of the blinking
rectangle (the farthest lower point from your
image).
b. You will see your cursor turn into a bi-directional
arrow. This arrow will allow you to drag the
rectangle to a disired position.
c. Move the rectangle until it is flush with
your image on all sides. Manipulate the blinking
rectangle with the arrow cursor until the rectangle
is flush around your image on all sides.
Note: If you wish to scan only a portion
of your image, you can move the blinking rectangle
to whatever portion of the image you wish
to scan. For instance, in the illustration
below, I have chosen to scan only a framed
portion of the photograph I have Previewed
(that which is inside the blinking rectangle):

6.
Now you are ready to scan the image for real.
Choose one of the four scanning options. Choose
according to which of these options (Color Photo;
Printed Matter; Text/Lineart, Web Image) best
describes the image you wish to scan.
Note: Here is a list of the default
settings which define each of the four options:
Color Photo is meant for color photographs,
obviously, and will scan with "True Color"
at 300 dpi (dots per inch, which refers to
the density of digital data defining your
image, otherwise known as resolution).
Text/Lineart is meant for unprinted
matter (for instance, drawings or hand-written
text documents) and will scan with "Black
and White" at 300 dpi.
Printed Matter is meant for printed
documents of all kinds and will scan with
"True Color" at 150 dpi.
Web Image will automatically adjust
your image to be web-safe by scanning at "216
Colors" at the most popular resolution
for web images, which is 72 dpi.
Note: There are reasons both for
and against choosing "Web Image"
at this juncture in your scanning career.
If you simply want to play it safe and know
that your image will be the scanned in an
appropriate file size for the web, then
choose this option now. On the other hand,
choosing from among the other three options
according to which best describes your image
will scan your image in at a higher resolution,
giving you more editing leeway as you manipulate
your digital image. You will be able to
save it in an appropriate file size for
the web later in this case.
Note: A rule of thumb when dealing
with digital images is that you can always
degrade the resolution of the image, but
you cannot upgrade the resolution.
7.
Click on the scanning option you have chosen.
This will give the command for the computer and
scanner to perform the actual scan of your image.
A small window will pop up and keep you updated
on the progress of the scan until the process
is complete.
8.
You will see the representation of your image
pop up behind the Vista Scan window when the scan
is complete. In order to begin editing this image,
you must close the Vista Scan software.
|
|
Step C. Editing Your
Image and Formatting It for the Web |
1.
The first thing you will want to do is save your
image to a drive (probably the D:\ drive: your
zip disk), so that if you do not complete your
work in this sitting or if the computer crashes
you will not have lost your work up to this point.
It is smart to set up a folder on your zip disk
called something like "Photoshop Images."
Use this folder to store images in the .psd
format, which is the format native to Photoshop.
Note: Eventually you will have to "Save
As" the document in either a .jpg
or a .gif (which are the web-compatible
formats), but it is a good habit to keep your
original .psd file too.
Note: The .psd format is extremely valuable
to you if you wish to make alterations to your
image. For one thing, this format saves your
image as a large file with a great deal of digital
complexity (whereas a .jpg or .gif compresses
your image into a much smaller file with much
less digital complexity). For another thing,
you can save your image file (as you continue
to alter the image) continuously without degrading
it (whereas each time you save a .jpg or .gif
file, it re-compresses and degrades). Until
you are ready to place your image in a web page,
then, it is a good idea to work with it as a
.psd file.
In order to save your document as a .psd file,
go to File>Save. Navigate to your "Photoshop
Images" folder on your disk, give your document
a name, and make sure you select ".psd"
as the file type. Then press "Save."
2.
If necessary, rotate your image so that it is
right-side up on your Photoshop screen.
To do this, go to Image>Rotate Canvas,
and rotate your image in whatever direction and
degree is appropriate.
3.
The next thing you will want to do now is to resize
your image so that it is an appropriate size for
the Web. Since most monitors display 800X600
pixels, your image cannot exceed these dimensions.
Go to Image>Size on the Photoshop menu
at the top of the screen. A window will pop up
containing the data of your image's size. Choose
the "pixels" option for both width and
height and then make sure your image's width is
no more than 600 pixels. (If it is larger than
600, erase the width shown, type in 600,
and press "OK." Feel free to
make your image smaller if you wish.
Note: Notice the representation of a
chain between the width and height of your image.
This chain represents the fact that the width
and height of your image is "locked together"
in Photoshop, meaning that when you change the
width of your image, Photoshop will change its
height automatically such that the proportions
of the image's original size remain intact.
4.
Next, detect the percentage of your image's true
size Photoshop is currently representing to you.
Look around your Photoshop screen for a small
box titled "Navigator," within which
is a small version of your image. If you do not
see this box, go to Window>Show Navigator
and it will appear on your screen.
Note: Sometimes you must look carefully
to find the Navigator box (and other similar
items) on your Photoshop screen. If you go to
Window and can only find a "Hide Navigator"
option on the pull-down menu, then the Navigator
box is most likely lurking beneath something
else on the Photoshop screen. You can drag these
small boxes around to different places on your
screen to see if anything is hiding beneath
them.
The default setting in the Navigator box for
the percentage of your image displayed on the
Photoshop screen is 66.6%. It is a good idea to
slide the arrow to the right on the Navigator
box until the image reaches 100%. This way you
will know exactly how large your image actually
is.
Note: After you discover the actual
size of your image, you may wish to adjust the
Navigator box again to suit the particular needs
of the image you are working with. For instance,
iIf you are working with an especially small
or especially large image, this percentage-shown
function can come in real handy. You can enlarge
the given image beyond 100% in order to see
the details of the image better; conversely,
you can shrink the image if it is too large
to fit on the Photoshop screen in its entirety
in its actual size. Once again though, if the
image is a manageable size at 100%, then it
is perhaps most convenient to keep the adjustment
there to remind you of what you are actually
working with size-wise.
5.
Photoshop offers many tools for altering the properties
of your image. To browse your options or
to look up directions for how to use a tool in
Photoshop, go to Help>Help Topics.
6.
When you are pleased with the outcome of your
image and are ready to place it into a web page,
it is time to save the image in a web-compatible
format. Go to File>Save As. Navigate
on your zip disk to the "Images" or
"Graphics" folder you have created for
the page or site into which you wish to place
this image. Give your image a name (this can be
the same name as it carries as a .psd file) and
make sure that you select either the .jpg (best
for photographs) or .gif (best for most other
things) format. Then press "Save."
Now you are ready to place your
image in a web page. If you need help with this,
please see the Transcriptions Getting
Started with Dreamweaver page.
|
|
|
|
|
|
|
