To download web pages in order to revise them,
you need an FTP ( "file transfer protocol") program
which allows you to move files between the remote
Transcriptions server and your local disk or hard
drive. If you are using a HTML editor like Dreamweaver,
chances are that this program will include a "site
management" or other feature that includes FTP.
Otherwise, there are common shareware or freeware
FTP utilities that you can use. One of the most
popular for the PC platform is WS-FTP, which comes
in a lite edition (WS-FTP LE) that is free for
academic users. You can download it from the following
Web site: http://www.ipswitch.com/cgi/download_eval.pl?product=WL-1000.
A common FTP program for the Mac platform is Fetch.
On-campus computing facilities should have one
of these programs installed on all their machines.
After installing or accessing the the FTP program,
you need to set it up to connect to the Transcriptions
server.
For WS-FTP 
Start the program. If the Connect dialogue does
not automatically appear, then hit "connect" to
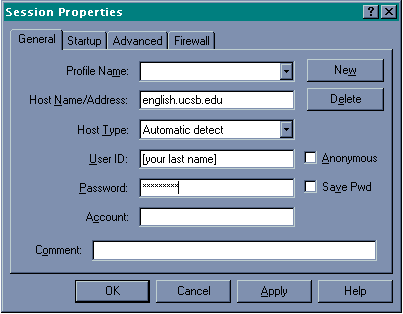
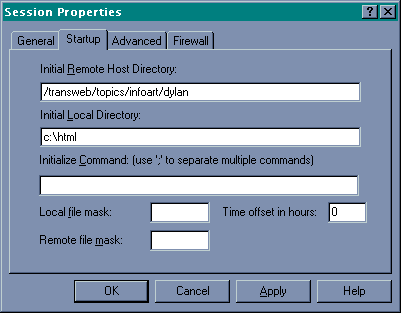
see the dialogue. The dialogue has four tabs,
only two of which need to be configured.

Under the General tab, set these parameters:
- Host Name/Address = [your server name, eg.
www.english.ucsb.edu]
- UserID = your last name (lower-case)
- Password = your password (e.g., t1234567a)

Under the Startup tab, set these parameters:
- Initial Remote Host Directory = [FTP directory
on server, e.g., /transweb/topics/[class project,
e.g., infoart]/[project folder, e.g., dylan]
- Initial Local Directory = [the folder on your
local hard drive where your project files reside,
e.g., c:\html (for your local hard drive) or
a:\html (for your floppy disk)]
When you hit "OK," the program should
connect to the server and display your local files
in a pane at the left of your screen and the remote
server files in your project directory in a pane
at the right of the screen. (You have to be online,
of course.) Select the files you want to transfer
in the righthand pane, and then hit the arrow
icon that points toward the lefthand pane. You
can get more than one file at a time by holding
the command key and clicking on each file you
wish to download. This will download the files
from the Transcriptions server to your disk or
local hard drive.
For Fetch 
Start the program. A login window will be displayed.
In the login window, set these parameters:
- Host = [your server name, e.g., www.english.ucsb.edu]
- User ID = your last name (lower-case)
- Password = your password (e.g., t1234567a)
- Directory = [FTP directory on server, e.g.,
/transweb/topics/[class project, e.g., infoart]/[project
folder, e.g., dylan]
When you hit "OK," the program should
connect to the server and display the files in
your project folder directory. Double-click the
file name in the file list or select the file
and click the "Get" button. You can
get more than one file at a time by holding the
command key and clicking on each file you wish
to download. You will be prompted for the place
to save the file(s); use the pop-up menu to find
the place you wish to save the file (e.g., your
disk or local hard drive) and click the "Save"
button.
|