layer hidden off the screen
UCSB English Department Home UCSB English Department Home UCSB English Department Home
Transcriptions
About TranscriptionsCurriculumResearchResourcesEvents
   
   Resources Uweb Publishing Basics
Directory


  1. Make Your Page (or Pages) 
  2. Upload Your Page to the Umail Server
  3. Test the Page
  4. Edit the Document

More tech guides Transcriptions technology paradigm

For UCSB Students with Umail Email Accounts.

This tutorial advises students at UCSB on the simplest route to publishing Web pages on their university server. The tutorial assumes only that students have a word-processing progam (e.g., Microsoft Word), a browser, and an Internet connection.

Students interested in advancing to more complex Web-authoring will be best served by learn to use a full-featured HTML editing program such as Dreamweaver. (See the Transcriptions Getting Started with Dreamweaver page. Dreamweaver and other software is available to Transcriptions / LCI students at various locations on campus, including the Transcriptions Studio).


Step A. Make Your Page (or Pages)


The Internet is made up of "pages." A page is simply a document (like a Word document) that is in a specific format (HTML) that Internet browsers are designed to display. To make your own pages, you need to create a document in HTML format. (For more information about HTML, see the resources in Learning Web Authoring.)

The easiest way to do this is to create your document in Microsoft Word (version 6.0 or higher) or alternative current-generation word-processing program and save it as an HTML document.

1. Create an initial document in Microsoft Word.

Hint: don't spend too much time formatting this document, because the document will inevitably look different as an HTML page viewed through an Internet browser. Initially, just get the content up there using the most basic formatting techniques (headings, paragraphs, bullets, and the like).

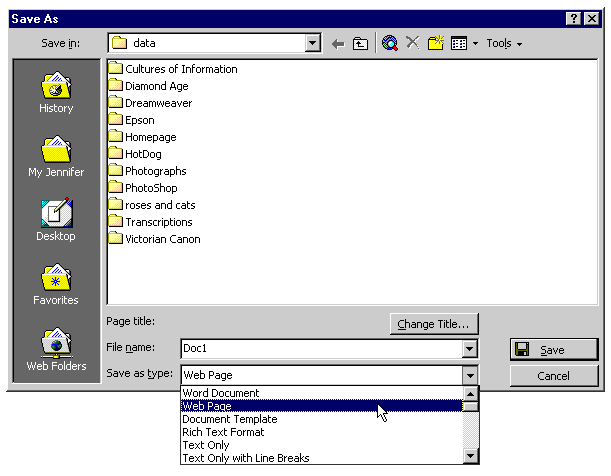
2. Next, save the document. go to the File menu and select Save as.

The Save as dialog box is displayed.

3. From the Save as type pull-down list, select the "HTML Document" option. (Note: In some versions of Microsoft Word, the correct option given for this step is "Web Page" rather than "HTML Document." See illustration below:

Word "Save As" Options

4. Give the document a name, navigate to the drive onto which you wish to save this document (very likely this will be the D:\ drive, which designates that the information be saved to your Zip Disk), and click Save.

We recommend that you name the document "default.html" if it will be the home page of your site (you'll see why later). Whatever you name it, don't use spaces or special characters. If you get a message about formatting being lost, just click OK. You can clean up formatting later.

5. Close your HTML document when you are ready to upload it.

Of course, if you have access to a program specifically designed for making HTML pages (like Dreamweaver or Frontpage), you will have much more control over formatting.


Step B. Upload Your Page to the Umail Server

Every UCSB student has web space and an http address reserved for them to use for their own web publishing. To "publish" on it, all you need to do is upload your HTML document to the correct folder on the Umail server. To do this:

1. Open a Web browser and go to: http://www.umail.ucsb.edu/

2. Click on the "My Account" icon:

UCSB Umail "My Account"

3. Enter your user id and password (same as for your Umail email account):

UCSB Umail "My Account": Login

4. Click on Storage Manager in the navigation bar.

5. Open (click on) the "Uweb" folder in the "File Listings" area.

UCSB Umail: File Listing

6. Go to the "File Upload" area and click on the Browse button.

This allows you to select a file you want to upload (i.e., the HTML document you just created)

7. Find your HTML document, select it, and click Open.

UCSB Umail: File Upload

8. Click the Upload File button.

the "File Listings" area will be redisplayed showing the file you just uploaded.


Step C. Test the Page

1. (Optional) Leaving the Storage Manager window up, open a new browser window.

This is so that you don't have to keep logging on to your Umail account for subsequent uploads.

2. If you named your HTML document "default.html," go to:

http://www.uweb.ucsb.edu/~[your user id]/

      Note: files named "default.html" open automatically when a user points a browser to the directory containing that file (other servers may also accept "index.html" or "index.htm" as the default file for a directory). If you named your HTML document something else, go to:

http://www.uweb.ucsb.edu/~[your user id]/[file name]

Now the document will appear in the browser window.


Step D. Edit the Document


If you want to make changes to the document, you can edit it and re-upload it until it looks the way you want it to look. Formatting HTML pages always involves a great deal of experimentation: you just have to experiment with the available formatting options in the editing program you are using (Microsoft Word, Dreamweaver, Frontpage, etc.) and repeatedly save and re-open the document in a browser to see how it really looks.

Note: If you are interested in learning Dreamweaver, which is a software application specifically designed for web writing and publishing, please see the TranscriptionsGetting Started with Dreamweaver page. You will find that you have much more control over your HTML documents in Dreamweaver than you do in Microsoft Word. If you become interested in creating your own graphics from documents not already in a digital format, see the Transcriptions Scanning Basics tutorial as well.


Click to format the
page for projection.
Click to return to the
default page view.